使用 Modal 的 Slack 潜在客户筛选器
在本例中,我们将构建一个代理应用,它能够:
- 自动研究加入公司公共 Slack 社区的每位新成员,以判断他们对公司的商业产品的契合度,
- 将此分析发送到一个(私有)Slack 频道,以及
- 将过去 24 小时内排名前 5 的潜在客户的每日摘要发送到(另一个)Slack 频道。
我们将在 Modal 上部署此应用,因为它允许你使用 Python 定义一个包含 Web 端点、定时函数和后台函数的应用,并通过命令行界面(CLI)进行部署,无需设置或管理任何基础设施。这是一个很好的方式,可以降低你组织中的人员开始构建和部署 AI 代理以简化其工作的门槛。
我们还添加了 Pydantic Logfire,以便在应用和代理响应 Webhook 和定时任务运行时,获得对其的可观察性。
屏幕截图
这是发送到 Slack 的分析的样子:

这是 Logfire 中相应追踪记录的样子:
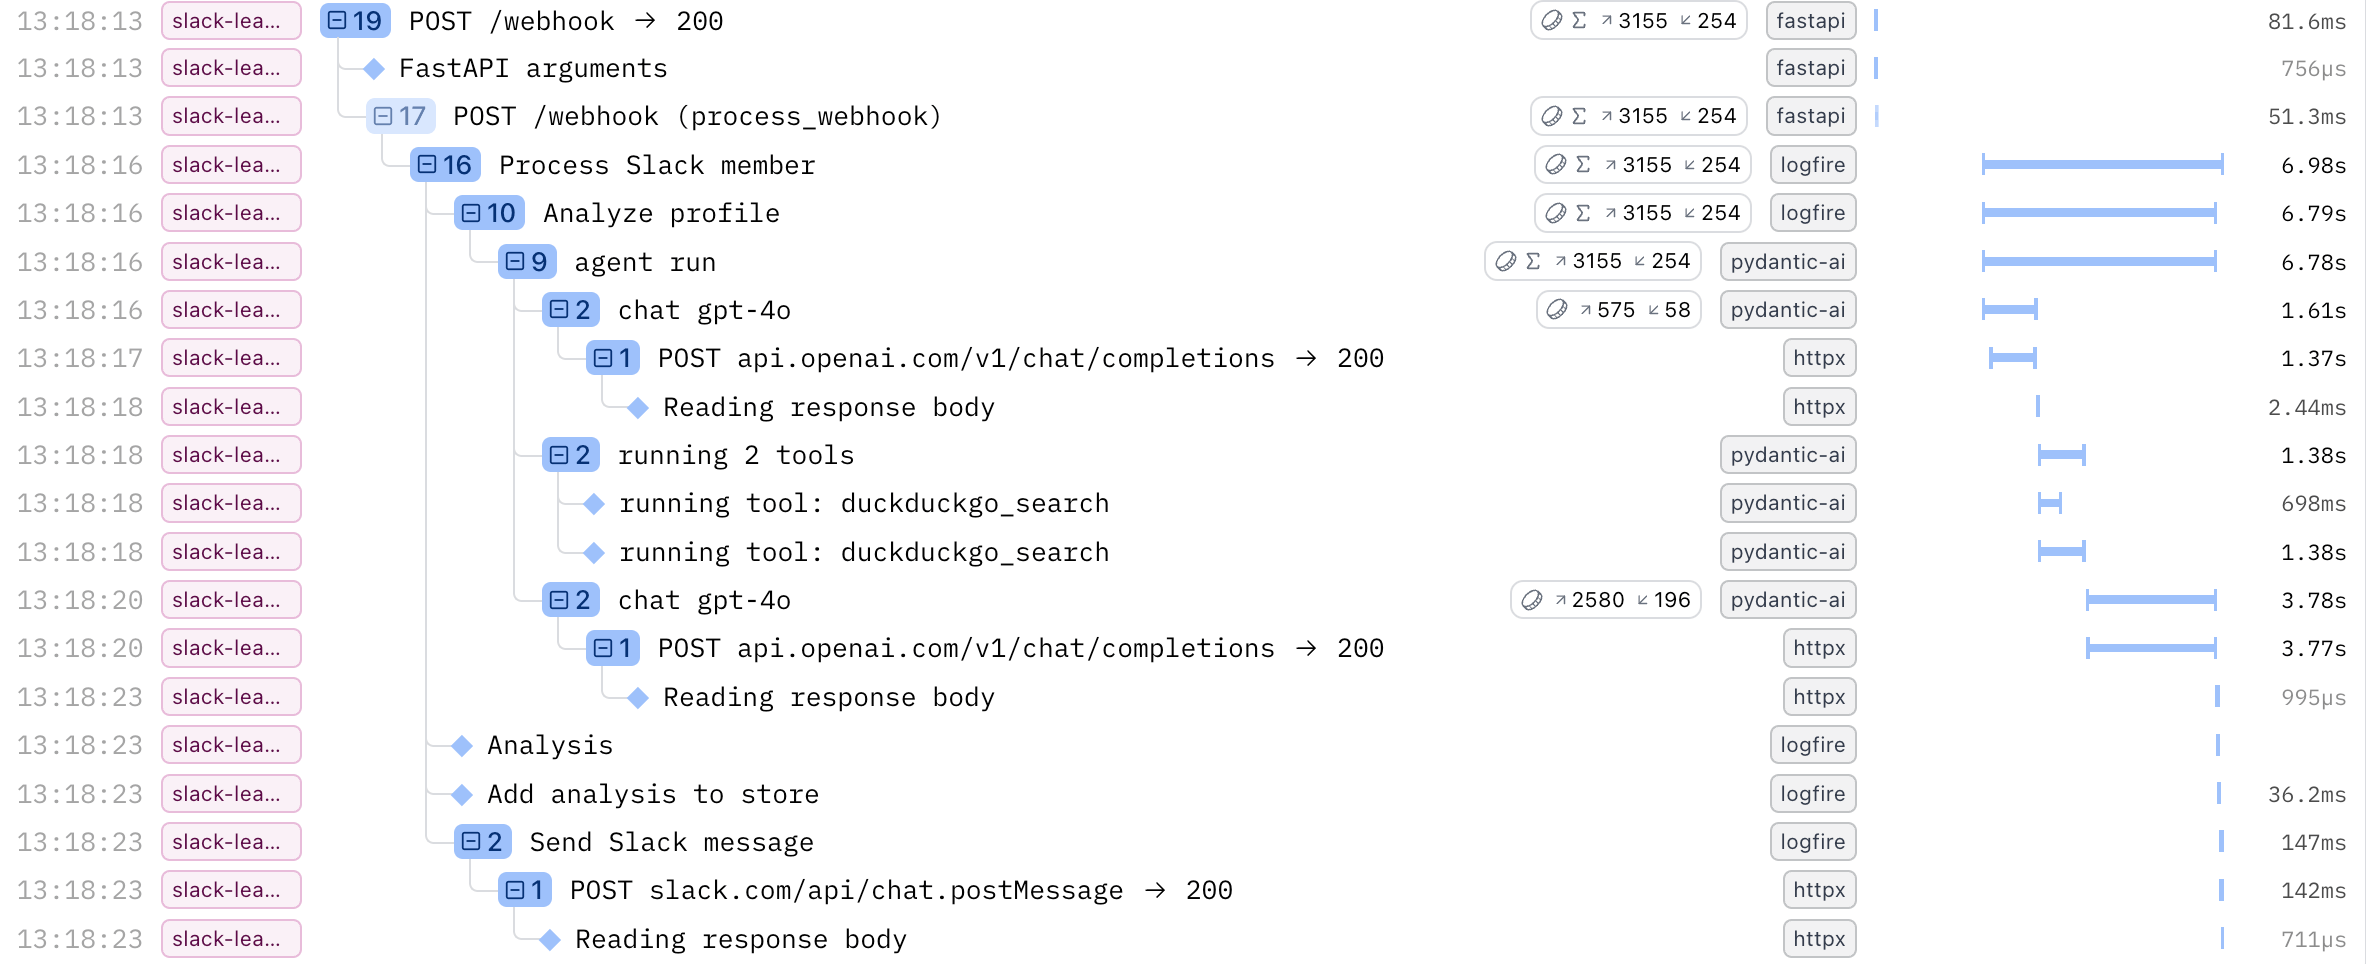
所有这些条目都可以点击,以获取有关该步骤发生情况的更多详细信息,包括与 LLM 的完整对话以及 HTTP 请求和响应。
前提条件
如果你只是想看代码,而不实际进行运行所需的设置,请随时跳转到代码部分。
Slack 应用
你需要拥有一个 Slack 工作区以及创建应用的必要权限。
- 按照 https://docs.slack.dev/quickstart 的说明创建一个新的 Slack 应用。
- 在第 2 步“请求作用域”中,请求以下作用域:
- 在第 3 步“安装和授权应用”中,记下访问令牌(Access Token),因为我们稍后需要将其作为 Secret 存储在 Modal 中。
- 你可以跳过第 4 步和第 5 步。我们之后需要订阅
team_join事件,但此时你还没有 Webhook URL。
-
创建应用将要发布消息的频道,并将 Slack 应用添加到这些频道中:
#new-slack-leads#daily-slack-leads-summary
这些名称在示例中是硬编码的。如果你想使用不同的频道,可以克隆仓库并在
examples/pydantic_examples/slack_lead_qualifier/functions.py中进行修改。
Logfire 写入令牌
- 如果你还没有 Logfire 账户,请在 https://logfire-us.pydantic.dev/ 上创建一个。
- 创建一个新项目,例如命名为
slack-lead-qualifier。 - 生成一个新的写入令牌(Write Token)并记下来,因为我们稍后需要将其作为 Secret 存储在 Modal 中。
OpenAI API 密钥
- 如果你还没有 OpenAI 账户,请在 https://platform.openai.com/ 上创建一个。
- 在“设置”中创建一个新的 API 密钥(API Key)并记下来,因为我们稍后需要将其作为 Secret 存储在 Modal 中。
Modal 账户
- 如果你还没有 Modal 账户,请在 https://modal.com/signup 上创建一个。
- 在 https://modal.com/secrets 上创建 3 个类型为“Custom”的 Secret:
- 名称:
slack,键:SLACK_API_KEY,值:你之前生成的 Slack 访问令牌 - 名称:
logfire,键:LOGFIRE_TOKEN,值:你之前生成的 Logfire 写入令牌 - 名称:
openai,键:OPENAI_API_KEY,值:你之前生成的 OpenAI API 密钥
- 名称:
用法
-
确保你已安装了依赖项。
-
使用 Modal 进行身份验证:
python/uv-run -m modal setup -
以临时的 Modal 应用方式运行示例,这意味着它只会在你使用 Ctrl+C 退出之前运行:
python/uv-run -m modal serve -m pydantic_ai_examples.slack_lead_qualifier.modal -
记下
Created web function web_app =>后面的 URL,这是你的 Webhook 端点 URL。 -
回到 https://docs.slack.dev/quickstart 并按照第 4 步“配置应用以监听事件”的说明,使用你记下的 Webhook 端点 URL 作为请求 URL 来订阅
team_join事件。
现在,当有新人(可能就是你用一个临时邮箱)加入 Slack 工作区时,你会在运行 modal serve 的终端和 Logfire 的实时视图中看到 Webhook 事件正在被处理,等待几秒钟后,你应该会在 #new-slack-leads Slack 频道中看到结果出现!
伪造 Slack 注册
你也可以像这样伪造一个 Slack 注册事件来试用这个代理,可以使用任何你喜欢的名字或邮箱:
curl -X POST <webhook endpoint URL> \
-H "Content-Type: application/json" \
-d '{
    "type": "event_callback",
    "event": {
        "type": "team_join",
        "user": {
            "profile": {
                "email": "samuel@pydantic.dev",
                "first_name": "Samuel",
                "last_name": "Colvin",
                "display_name": "Samuel Colvin"
            }
        }
    }
}'
部署到生产环境
如果你想以持久的方式将此应用部署到你的 Modal 工作区,可以使用此命令:
python/uv-run -m modal deploy -m pydantic_ai_examples.slack_lead_qualifier.modal
你可能需要先下载代码,将其放入一个新的仓库,然后使用 GitHub Actions 进行持续部署。
不要忘记将 Slack 事件请求 URL 更新为新的持久 URL!你还需要根据自己的情况修改代理的指令。
代码
我们将从基础开始,然后逐步构建完整的应用程序。
模型
个人资料
首先,我们定义一个 Pydantic 模型来表示 Slack 用户个人资料。这些是我们从发送到 Webhook 端点的 team_join 事件中获得的字段,我们稍后会定义这个端点。
...

class Profile(BaseModel):
    first_name: str | None = None
    last_name: str | None = None
    display_name: str | None = None
    email: str

...
我们还定义了一个 Profile.as_prompt() 辅助方法,它使用 format_as_xml 将个人资料转换为可以发送给模型的字符串。
...

from pydantic_ai import format_as_xml

...

class Profile(BaseModel):

...

    def as_prompt(self) -> str:
        return format_as_xml(self, root_tag='profile')

...
分析
我们需要的第二个模型代表代理将执行的分析结果。我们包含文档字符串(docstrings),为模型提供关于这些字段应包含内容的额外上下文。
...

class Analysis(BaseModel):
    profile: Profile
    organization_name: str
    organization_domain: str
    job_title: str
    relevance: Annotated[int, Ge(1), Le(5)]
    """Estimated fit for Pydantic Logfire: 1 = low, 5 = high"""
    summary: str
    """One-sentence welcome note summarising who they are and how we might help"""

...
我们还定义了一个 Analysis.as_slack_blocks() 辅助方法,它将分析结果转换为一些可以发送到 Slack API 以发布新消息的 Slack blocks。
...

class Analysis(BaseModel):

...

    def as_slack_blocks(self, include_relevance: bool = False) -> list[dict[str, Any]]:
        profile = self.profile
        relevance = f'({self.relevance}/5)' if include_relevance else ''
        return [
            {
                'type': 'markdown',
                'text': f'[{profile.display_name}](mailto:{profile.email}), {self.job_title} at [**{self.organization_name}**](https://{self.organization_domain}) {relevance}',
            },
            {
                'type': 'markdown',
                'text': self.summary,
            },
        ]
代理
现在是时候深入了解 Pydantic AI 并定义将进行实际分析的代理了!
我们指定了要使用的模型(openai:gpt-4o),提供了指令,让代理能够访问 DuckDuckGo 搜索工具,并告诉它使用原生输出结构化输出模式输出 Analysis 或 None。
这个应用的核心在于那些告诉代理如何评估每个新 Slack 成员的指令。如果你打算自己使用这个应用,你当然需要根据自己的情况修改它们。
...

from pydantic_ai import Agent, NativeOutput
from pydantic_ai.common_tools.duckduckgo import duckduckgo_search_tool

...

agent = Agent(
    'openai:gpt-4o',
    instructions=dedent(
        """
        When a new person joins our public Slack, please put together a brief snapshot so we can be most useful to them.

        **What to include**

        1. **Who they are:**  Any details about their professional role or projects (e.g. LinkedIn, GitHub, company bio).
        2. **Where they work:**  Name of the organisation and its domain.
        3. **How we can help:**  On a scale of 1–5, estimate how likely they are to benefit from **Pydantic Logfire**
           (our paid observability tool) based on factors such as company size, product maturity, or AI usage.
           *1 = probably not relevant, 5 = very strong fit.*

        **Our products (for context only)**
        • **Pydantic Validation** – Python data-validation (open source)
        • **Pydantic AI** – Python agent framework (open source)
        • **Pydantic Logfire** – Observability for traces, logs & metrics with first-class AI support (commercial)

        **How to research**

        • Use the provided DuckDuckGo search tool to research the person and the organization they work for, based on the email domain or what you find on e.g. LinkedIn and GitHub.
        • If you can't find enough to form a reasonable view, return **None**.
        """
    ),
    tools=[duckduckgo_search_tool()],
    output_type=NativeOutput([Analysis, NoneType]),
)

...
analyze_profile
我们还定义了一个名为 analyze_profile 的辅助函数,它接受一个 Profile,运行代理,并返回一个 Analysis(或 None),并使用 Logfire 对其进行检测。
...

@logfire.instrument('Analyze profile')
async def analyze_profile(profile: Profile) -> Analysis | None:
    result = await agent.run(profile.as_prompt())
    return result.output
分析存储
我们需要的下一个构建块是存储所有已完成分析的地方,这样我们在发送每日摘要时就可以查阅它们。
幸运的是,Modal 为我们提供了一种方便的方式来存储一些数据,这些数据可以在后续的 Modal 运行(Webhook 或定时任务)中被读取:modal.Dict。
我们定义了一些便捷的方法,以便轻松地添加、列出和清除分析。
...

import modal

...

class AnalysisStore:
    @classmethod
    @logfire.instrument('Add analysis to store')
    async def add(cls, analysis: Analysis):
        await cls._get_store().put.aio(analysis.profile.email, analysis.model_dump())

    @classmethod
    @logfire.instrument('List analyses from store')
    async def list(cls) -> list[Analysis]:
        return [
            Analysis.model_validate(analysis)
            async for analysis in cls._get_store().values.aio()
        ]

    @classmethod
    @logfire.instrument('Clear analyses from store')
    async def clear(cls):
        await cls._get_store().clear.aio()

    @classmethod
    def _get_store(cls) -> modal.Dict:
        return modal.Dict.from_name('analyses', create_if_missing=True)  # type: ignore
注意
请注意最后一行的 # type: ignore —— 不幸的是 modal 并未完全定义其类型,所以我们需要这样做来阻止我们的静态类型检查器 pyright(我们在所有 Pydantic AI 代码包括示例中都运行它)报错。
发送 Slack 消息
接下来,我们需要一种实际发送 Slack 消息的方法,因此我们定义了一个简单的函数,它使用 Slack 的 chat.postMessage API。
...

API_KEY = os.getenv('SLACK_API_KEY')
assert API_KEY, 'SLACK_API_KEY is not set'


@logfire.instrument('Send Slack message')
async def send_slack_message(channel: str, blocks: list[dict[str, Any]]):
    client = httpx.AsyncClient()
    response = await client.post(
        'https://slack.com/api/chat.postMessage',
        json={
            'channel': channel,
            'blocks': blocks,
        },
        headers={
            'Authorization': f'Bearer {API_KEY}',
        },
        timeout=5,
    )
    response.raise_for_status()
    result = response.json()
    if not result.get('ok', False):
        error = result.get('error', 'Unknown error')
        raise Exception(f'Failed to send to Slack: {error}')
特性
现在我们可以开始将这些构建模块组合起来,以实现我们想要的实际功能了!
process_slack_member
此函数接收一个 Profile,使用代理对其进行分析,将其添加到 AnalysisStore 中,然后将分析结果发送到 #new-slack-leads 频道。
...

from .agent import analyze_profile
from .models import Profile

from .slack import send_slack_message
from .store import AnalysisStore

...

NEW_LEAD_CHANNEL = '#new-slack-leads'

...

@logfire.instrument('Process Slack member')
async def process_slack_member(profile: Profile):
    analysis = await analyze_profile(profile)
    logfire.info('Analysis', analysis=analysis)

    if analysis is None:
        return

    await AnalysisStore().add(analysis)

    await send_slack_message(
        NEW_LEAD_CHANNEL,
        [
            {
                'type': 'header',
                'text': {
                    'type': 'plain_text',
                    'text': f'New Slack member with score {analysis.relevance}/5',
                },
            },
            {
                'type': 'divider',
            },
            *analysis.as_slack_blocks(),
        ],
    )

...
send_daily_summary
该函数列出 AnalysisStore 中的所有分析,按相关性取前 5 个,将它们发送到 #daily-slack-leads-summary 频道,并清除 AnalysisStore,以便下一次每日运行时不会再次处理这些分析。
...

from .slack import send_slack_message
from .store import AnalysisStore

...

DAILY_SUMMARY_CHANNEL = '#daily-slack-leads-summary'

...

@logfire.instrument('Send daily summary')
async def send_daily_summary():
    analyses = await AnalysisStore().list()
    logfire.info('Analyses', analyses=analyses)

    if len(analyses) == 0:
        return

    sorted_analyses = sorted(analyses, key=lambda x: x.relevance, reverse=True)
    top_analyses = sorted_analyses[:5]

    blocks = [
        {
            'type': 'header',
            'text': {
                'type': 'plain_text',
                'text': f'Top {len(top_analyses)} new Slack members from the last 24 hours',
            },
        },
    ]

    for analysis in top_analyses:
        blocks.extend(
            [
                {
                    'type': 'divider',
                },
                *analysis.as_slack_blocks(include_relevance=True),
            ]
        )

    await send_slack_message(
        DAILY_SUMMARY_CHANNEL,
        blocks,
    )

    await AnalysisStore().clear()
Web 应用
就目前而言,这两个函数实际上都没有被任何地方调用。
让我们实现一个 FastAPI 端点来处理 team_join Slack Webhook(也称为 Slack Events API),并调用我们刚刚定义的 process_slack_member 函数。我们还顺便使用 Logfire 对 FastAPI 进行了检测。
...

app = FastAPI()
logfire.instrument_fastapi(app, capture_headers=True)


@app.post('/')
async def process_webhook(payload: dict[str, Any]) -> dict[str, Any]:
    if payload['type'] == 'url_verification':
        return {'challenge': payload['challenge']}
    elif (
        payload['type'] == 'event_callback' and payload['event']['type'] == 'team_join'
    ):
        profile = Profile.model_validate(payload['event']['user']['profile'])

        process_slack_member(profile)
        return {'status': 'OK'}

    raise HTTPException(status_code=status.HTTP_422_UNPROCESSABLE_ENTITY)
使用 Modal 的 process_slack_member
我刚才耍了点小聪明——我们实际上并没有直接调用我们在 functions.py 中定义的 process_slack_member 函数,因为 Slack 要求 Webhook 在 3 秒内响应,而我们需要比这更长的时间来与 LLM 对话、进行一些网页搜索以及发送 Slack 消息。
取而代之的是,我们调用了与应用一起定义的以下函数,它使用 Modal 的 modal.Function.spawn 功能在后台运行一个函数。(如果你好奇这个函数的 Modal 端是什么样子,可以跳转到后面查看。)
因为 modal.py(我们将在下一节看到)导入了 app.py,所以我们在函数定义内部从 modal.py 导入,因为在顶层这样做会导致循环导入错误。
我们还传递了当前的 Logfire 上下文以实现分布式追踪,这意味着后台函数的执行将显示在 Webhook 请求追踪的嵌套下,这样我们就能将与该请求相关的所有内容集中在一处。
...

def process_slack_member(profile: Profile):
    from .modal import process_slack_member as _process_slack_member

    _process_slack_member.spawn(
        profile.model_dump(), logfire_ctx=get_context()
    )

...
Modal 应用
现在让我们看看 Modal 让部署这一切变得多么容易。
设置 Modal
我们首先定义 Modal 应用,指定要使用的基础镜像(带有 Python 3.13 的 Debian)、它需要的所有 Python 包,以及在 Modal 界面中定义的所有需要在运行时可用的 Secret。
...

import modal

image = modal.Image.debian_slim(python_version='3.13').pip_install(
    'pydantic',
    'pydantic_ai_slim[openai,duckduckgo]',
    'logfire[httpx,fastapi]',
    'fastapi[standard]',
    'httpx',
)
app = modal.App(
    name='slack-lead-qualifier',
    image=image,
    secrets=[
        modal.Secret.from_name('logfire'),
        modal.Secret.from_name('openai'),
        modal.Secret.from_name('slack'),
    ],
)

...
设置 Logfire
接下来,我们定义一个函数来为 Pydantic AI 和 HTTPX 设置 Logfire 检测。
我们不能在文件的顶层执行此操作,因为所请求的包(如 logfire)仅在 Modal 上运行的函数(如下面我们将定义的那些)内部可用。此文件 modal.py 在你的本地机器上运行,并且只能访问 modal 包。
...

def setup_logfire():
    import logfire

    logfire.configure(service_name=app.name)
    logfire.instrument_pydantic_ai()
    logfire.instrument_httpx(capture_all=True)

...
Web 应用
要在 Modal 上部署一个 Web 端点,我们只需定义一个返回 ASGI 应用(如 FastAPI)的函数,并用 @app.function() 和 @modal.asgi_app() 对其进行装饰。
这个 web_app 函数将在 Modal 上运行,因此在函数内部我们可以调用需要 logfire 包的 setup_logfire 函数,并导入使用其他请求包的 app.py。
默认情况下,Modal 会按需启动一个容器来处理函数调用(如 Web 请求),这意味着每个请求都会有一点启动时间。然而,Slack 要求 Webhook 在 3 秒内响应,因此我们指定 min_containers=1 以保持 Web 端点持续运行并随时准备响应请求。这有点烦人且浪费资源,但幸运的是 Modal 的定价相当合理,你每月有 30 美元的免费计算额度,并且他们为初创公司和学术研究人员提供高达 5 万美元的免费额度。
...

@app.function(min_containers=1)
@modal.asgi_app()  # type: ignore
def web_app():
    setup_logfire()

    from .app import app as _app

    return _app

...
注意
请注意 @modal.asgi_app() 行上的 # type: ignore —— 不幸的是,modal 并未完全定义其类型,所以我们需要这样做来阻止我们的静态类型检查器 pyright(我们在所有 Pydantic AI 代码包括示例中都运行它)报错。
定时发送 send_daily_summary
要定义一个定时函数,我们可以使用带有 schedule 参数的 @app.function() 装饰器。这个 Modal 函数将在每天 UTC 时间早上 8 点调用我们导入的 send_daily_summary 函数。
...

@app.function(schedule=modal.Cron('0 8 * * *'))  # Every day at 8am UTC
async def send_daily_summary():
    setup_logfire()

    from .functions import send_daily_summary as _send_daily_summary

    await _send_daily_summary()
后台处理的 process_slack_member
最后,我们定义一个 Modal 函数来包装我们的 process_slack_member 函数,这样它就可以在后台运行。
正如你从我们从 Web 应用中启动此函数时记得的那样,我们传递了 Logfire 上下文以实现分布式追踪,所以我们需要在这里附加它。
...

@app.function()
async def process_slack_member(profile_raw: dict[str, Any], logfire_ctx: Any):
    setup_logfire()

    from logfire.propagate import attach_context

    from .functions import process_slack_member as _process_slack_member
    from .models import Profile

    with attach_context(logfire_ctx):
        profile = Profile.model_validate(profile_raw)
        await _process_slack_member(profile)

...